
The High Country Xeriscape Council of Arizona is a non-profit 501 C-3 corporation dedicated to educating our communities about water-wise gardening. For additional information write:
HCXCA
4397 E AZ Highway 260
Payson, AZ 85541
Water Efficiency 
Use water wisely by watering your garden with free water collected from your roof.
Rain water is great for plants.
Connect a soaker hose to your barrel, a great way to water shallow rooted plants such as rhododendrons.
Use your rain barrel in areas where you may not have a convenient spigot. Near your compost pile is a good idea to keep it as wet as a wrung-out sponge, promoting the composting process during the dryer months of summer.
Rain water is usually soft and free of dissolved minerals. This untreated water is great for your indoor plants, your garden and lawn, or washing your car.
Diversion of Rain Water from the Wastewater Treatment Plant
In older areas where storm sewers and sanitary sewers are combined, the disconnection of downspouts can be enhanced by the use of a rain barrel. Collect rain water that would have otherwise been unnecessarily treated. A rain barrel won't solve the combined sewer overflow problem, but it is a good way to help.
Some tips for making your barrel
55-gallon food grade quality recycled barrel.
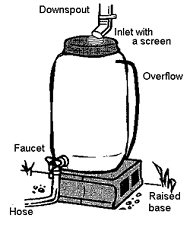
Install an overflow at the top. This is an important feature. A full barrel has the potential to spill additional water over the top and may cause localized erosion.
Consider attaching the overflow to the downspout with a valve. Simply turn the valve off when the barrel is full and redirecting the runoff back into the downspout.
As an alternative to the spigot on the diagram, purchase a spigot with a threaded nipple and simply twist it into the 1" hole.
Tips for using your rain barrel
Do not use collected water for drinking, cooking or bathing.
Keep the lid secure so children or animals cannot fall into the barrel.
Disconnect the barrel during the winter to avoid constant overflow during the rainiest months. Attach it in the early spring to fill it for use.
Most recycled barrels need to be cleaned before first use.
If a moss killer has been used on the roof let a couple of rainfall events go by before collecting the roof runoff.
Elevate your rain barrel slightly to make access to the spigot easier.
The screened louver vent will prevent mosquitoes from breeding in your barrel.
Consider joining multiple barrels for additional capacity!
Making a rain barrel is as easy as 1,2,3
Step 1

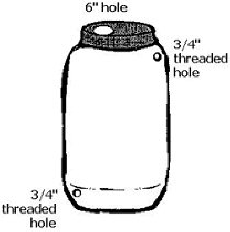
Use a 6" hole saw, a saber saw, a keyhole saw or a drywall saw to cut a perfectly round 6” hole on the top of your barrel.
Drill two holes with a 29/32” drill bit, one towards the top for an overflow and one towards the bottom of the barrel for the faucet.
Next use a 3/4" NPT pipe tap and twist it into the upper 29/32" hole, then untwist the tap and back it out of the hole, then repeat the same process for the lower 29/32" hole
Rinse your barrel out thoroughly, as it previously had a food product in it. Avoid using bleach, as it is environmentally harmful in the storm drains. For an environmentally safe soap solution use 2 teaspoons of castile soap and 2 teaspoons of vinegar or lemon juice for every gallon of water used to clean your barrel.
Step 2

Twist in the threaded side of the hose adapter into the 3/4" threaded hole towards the top of the barrel.
Prepare the threaded side of the brass faucet by:
Wrapping it tightly with teflon tape, make four or five rotations until all the threads are covered; or
Applying a thin ribbon of Kitchen and Bath All Purpose Adhesive Caulk, or similar sealant.
Twist in the threaded and now prepared end of the faucet into the 3/4" threaded hole towards the bottom of the barrel.
Step 3

Cover the 6" hole in the top by placing the 6" louvered screen onto the barrel with the louvered side up and the screen side down.
Slide a hose onto the hose adapter at the top of barrel to direct the overflow water away from your home.
Place two cinder blocks under the selected downspout and place the barrel on this raised base.
Cut your downspout about 4" above the top of the barrel, add an elbow, and make any final adjustments to the base and barrel.
Add a hose on the faucet or keep it available to fill a watering can.
Enjoy your rainbarrel!
City of Bremerton, Department of Public Works and Utilities, Water Conservation 4R-WATER (479-2837)
copyright 2003© HCXCA